

Most damage on small art and gift orders doesn't come from one dramatic drop. It comes from small movements repeated over hundreds of miles. A print slides half an inch inside its tube, and the paper edge meets the end cap every time the parcel is lifted and set down. A candle in a glass jar shifts a little in a loose carton, and by the second sorting center, the rim has a chip. Nothing about either package looked wrong when it left the studio.
The fix is the same idea in both cases. Stop the item from moving, then give the outer pack enough strength to take the knocks. This guide covers how to do that for the two shapes small sellers ship most – rolled paper and fragile objects – and how to choose packaging that doesn't cost more than the piece it protects.
Why Movement Does More Harm Than Impact
Regular carriers handle parcels on conveyors, chutes, and stacked carts. A well-packed item can take a fair amount of force because the force spreads across the whole pack. A loose item can't, because every knock turns into a small collision between the product and its own packaging.
Rolled prints show this first at the ends. If the roll is shorter than the tube and nothing holds it in place, the paper travels back and forth, and the edges soften, curl, or tear. Glass and ceramics show it as chips and hairline cracks where the item touched a wall. In both cases, the packaging was strong enough. It simply wasn't snug.
So, the order of thinking matters. First decide how the item will be held still. Then decide what outer container will carry that held item safely.
Choosing a Mailing Tube That Fits the Print
For posters, art prints, drawings, certificates, and maps, a tube is the right container because the paper never has to fold. The details that decide whether it arrives flat are size, wall, and closure.
Size starts with the internal diameter, which is the opening your rolled print has to pass through. A useful sizing guideline from tube packaging suppliers is to allow 1–2 mm of clearance around the widest part of the roll and 1–2 inches of extra tube length so the paper does not press against the end caps. Too much room can allow the roll to shift, while a tube that is too tight can make insertion and removal difficult.
The wall is where people tend to cut corners, and it is usually the reason a tube arrives dented. The range most suppliers work with looks like this.
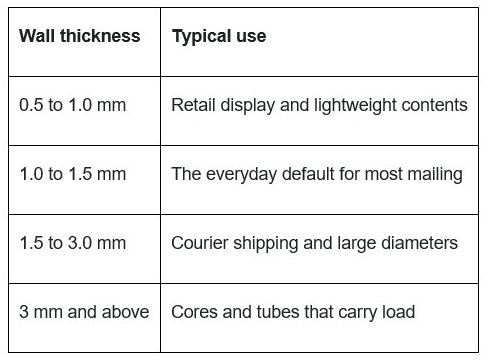
For anything going by a regular courier, the thicker end of the range is worth the small extra cost. A strong kraft wall keeps its round shape when other parcels are stacked on it, and a round tube is much harder to crush than a dented one.
Closures matter more than most sellers expect. Plastic push caps give the best grip for the price on mailed tubes. Paperboard plugs keep the whole pack paper-based if that matters to your buyers. If you ship prints often, it is worth ordering custom kraft mailing tubes in the exact length of your standard print sizes, because a tube cut to fit removes most of the empty space that causes damage in the first place.
Rolling the Print Before It Goes In
The tube only protects what goes into it in good shape, so the roll itself deserves a minute of care.
- Interleave the artwork with glassine or acid-free tissue so the printed surface never rubs against itself or the tube wall.
- Roll it loosely around its own width rather than forcing a tight coil, which can set a curl that the buyer then fights for weeks.
- For paintings on canvas, conservators generally roll with the paint side facing out so the paint layer is stretched rather than compressed.
- Fill any gap at each end with crumpled paper so the roll can't travel along the length of the tube.
- Tape the caps in place, since a cap that pops off in transit undoes everything else.
A short note inside the tube telling the buyer which way to unroll and how to flatten the print also saves a lot of nervous emails.
When a Box Is the Better Choice
Some pieces can't be rolled at all. Framed work, ceramics, glassware, and candles in jars all need a box, and for these, the inside of the box matters more than the outside.
A loose fragile item inside an oversized carton is the most common packing mistake small sellers make. The fix is an insert, a fitted piece that holds the product in a fixed position with a little clearance on every side. Candle makers deal with this every day because glass jars are heavy for their size and break easily at the rim, which is why candle boxes with inserts are built around precise cutouts instead of loose fill.
The method transfers to almost any fragile object. Measure the item's height, width, and depth, then allow about 2 to 3 mm of clearance for the insert. That small gap lets the piece go in and come out without force while still stopping it from sliding.
Comparing Insert Materials
Not every insert needs to be foam. The right choice depends on how fragile the item is, how many pieces share one box, and how your customers feel about plastics.
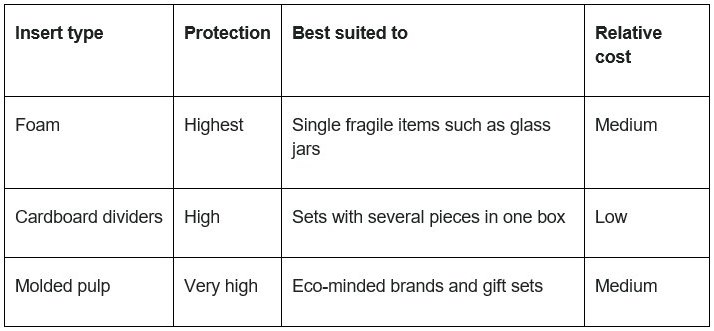
Cardboard dividers are the quiet workhorse for sets because they keep pieces apart and stop them from hitting each other, which is where most breakage in a multi-item box happens. Molded pulp suits brands whose buyers notice what the packaging is made of.
The box material should match the weight. Light items sit well in printed cardstock or folding cartons. Heavier pieces need rigid boards, and anything shipped in bulk does best in double-wall corrugated boxes.
Double Boxing Anything That Can Shatter
For truly fragile work, one box is rarely enough. The standard approach is to pack the item in its fitted inner box, then place that box inside a larger corrugated shipper with cushioning on every side. A common carrier guideline is about two inches of cushioning between the inner and outer box.
Double boxing works because the two layers do different jobs. The inner box and insert hold the item still. The outer box and cushioning absorb the knocks. Trying to make one box do both is how corners get crushed straight through to the product.
A Short Checklist Before You Seal
Run through these steps before any fragile or rolled order leaves the studio.
- Shake the closed package gently and listen. If anything moves, add fill or tighten the fit.
- Check that a rolled print is shorter than the tube by roughly an inch at each end and that the ends are packed.
- Confirm tube caps or box flaps are taped and can't open under pressure.
- Make sure the item sits in an insert or fitted space, not loose in the middle of a carton.
- Label the parcel clearly and keep the label flat on a smooth surface so scanners can read it.
Ordering Packaging in Small Runs
Many artists and makers assume custom packaging only makes sense at large volumes. That is less true than it used to be. Fitted candle boxes with inserts are commonly available from a minimum of 100 units, and kraft mailing tubes usually start at a standard minimum of 500, with smaller runs of around 100 possible at a higher price per piece. Typical production for tubes runs about 6 to 10 business days after approval, which is fast enough to plan around a limited edition or a seasonal release.
The real saving shows up in fewer replacements. Every broken jar or creased print costs the item, the shipping both ways, and a little of the buyer's trust. Packaging that fits the product stops most of that before it starts.
The Simple Rule Behind All of It
A rolled giclée print crossing the country and a hand-poured candle headed to a gift shop follow the same principle. Hold the item still, then protect the thing that's holding it. Get the fit right first, and the rest of the packing becomes far easier to get right too.